https://docs.isaacsim.omniverse.nvidia.com/5.1.0/ros2_tutorials/tutorial_ros2_tf.html
ROS2 Transform Trees and Odometry — Isaac Sim Documentation
To setup odometry for a robot, publish the odometry ROS message and its corresponding transforms. Note The ROS2 Publish Odometry node publishes full 3D velocity information. Both linear velocity and angular velocity are published with all three dimensions
docs.isaacsim.omniverse.nvidia.com
Turtlebot transform Graph
- Articulation Transforms
- 관절(articulated) 로봇의 각 링크(linkage)의 transform을 얻으려면?
- ==> ROS2 Publish Transform Tree 노드의 targetPrims 필드에 "로봇의 articulated root"를 추가하면 된다.
articulation root이후의 모든 링크들은 자동으로 publish 된다.- 참고 : 만약 articulated robot에 대해서 생성된 transform tree가, 잘못된 링크를 root link로 선택했다면, 아래 단계로 articulation root link를 수동으로 선택한다.
- 1. strage tree에서 로봇의 root prim을 선택하고, Raw USD Properties 탭에서 Articulation Root Section을 찾는다. 섹션 오른쪽 위의 X를 눌러 삭제한다.
- 2. Stage Tree에서 원하는 링크를 선택하고, Raw USD Properties 탭에서 +ADD를 누른 뒤
Physics > Articulation Root를 추가한다. - 3. articulation root를 변경한 후 파일을 저장하고 다시 로드한다.
- 참고 : 만약 articulated robot에 대해서 생성된 transform tree가, 잘못된 링크를 root link로 선택했다면, 아래 단계로 articulation root link를 수동으로 선택한다.
- ==> ROS2 Publish Transform Tree 노드의 targetPrims 필드에 "로봇의 articulated root"를 추가하면 된다.
- 관절(articulated) 로봇의 각 링크(linkage)의 transform을 얻으려면?

Publish Relative Transforms
- 기본적으로 transform은 world frame을 기준으로 한다.
- Turtlebot의 /base_link transform이 /world에 대해 publish 되는지 확인 가능.
setting Up Odometry
- 로봇의 odometry를 설정하려면, odometry ROS 메시지와 해당되는 transform을 publish해야한다.
- 1. 우선 불러온 turtlebot3의 articulation root가 /world/turtlebot3_burger인지 확인한다. ( 그림1 )
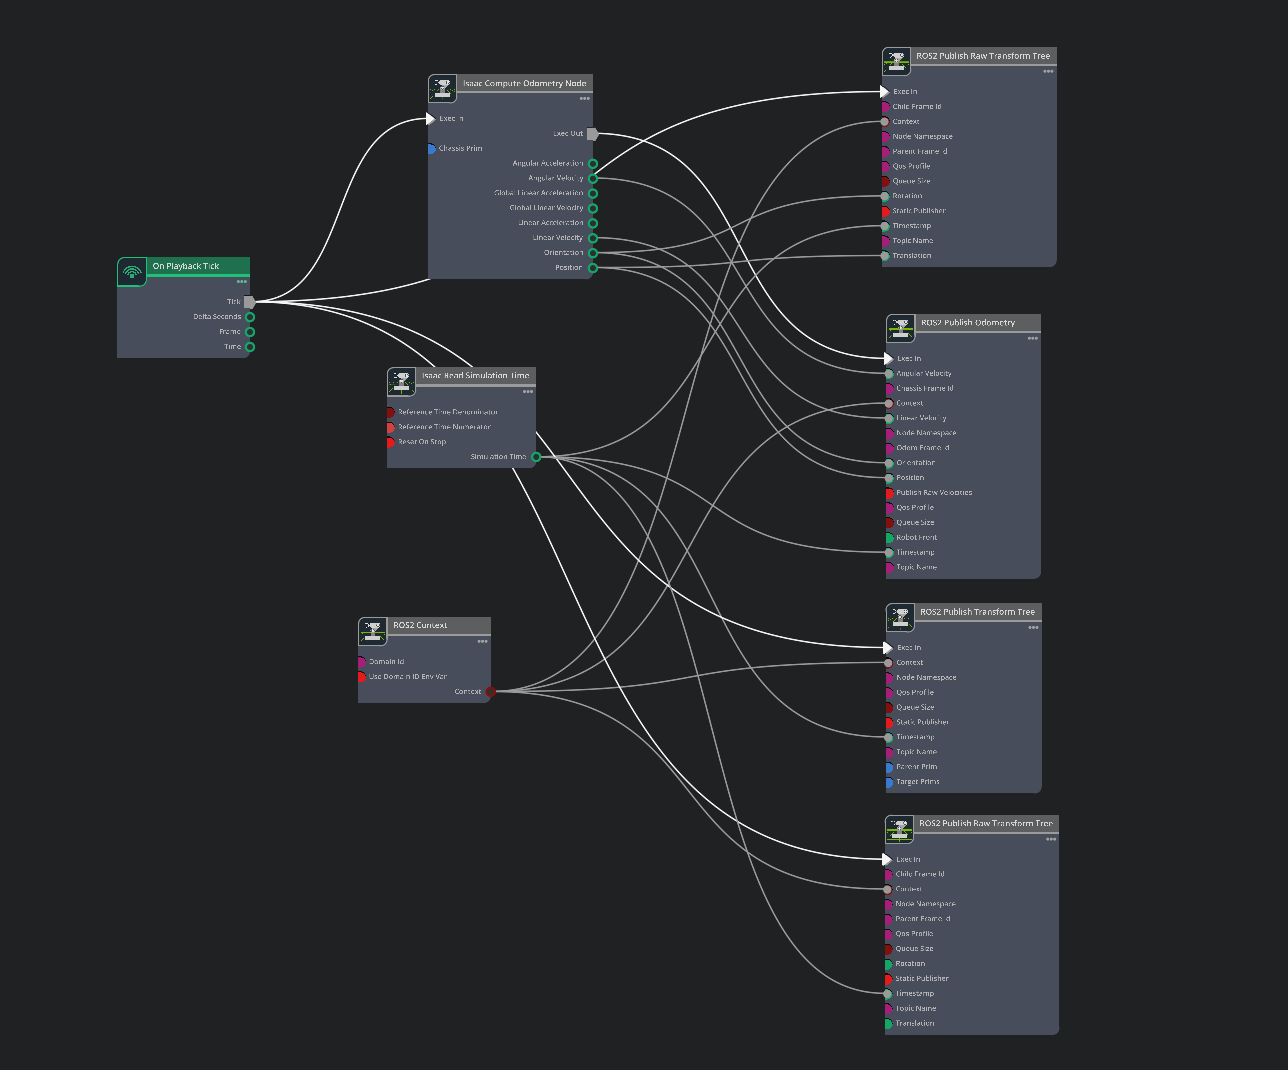
- 2. odmetry publisher를 설정하기 위해서, 그림2와 같은 action graph를 구성.
- 2-1. issac compute odometry노드의 property탭(그림 3)
- chassis prim 입력 필드에 대해서 turtlebot prim을 추가한다.
해당 노드는 robot의 start position에 대한 상대위치를 계산한다.
출력은 /odom토픽 publisher와, /odom프레임에서 /base_link프레임으로의 단일 transform을 publish하는 TF publisher에 모두 입력됨.
- chassis prim 입력 필드에 대해서 turtlebot prim을 추가한다.
- 2-2. ros2 publish Raw Transform Tree노드의 property탭 ( 그림 4)
- childFramdId입력을 base_link로 설정
- parentFrameId입력을 odom으로 설정
- ==> 이제 transform tree에서 odom --> base_link 프레임 publish가 활성화된다.
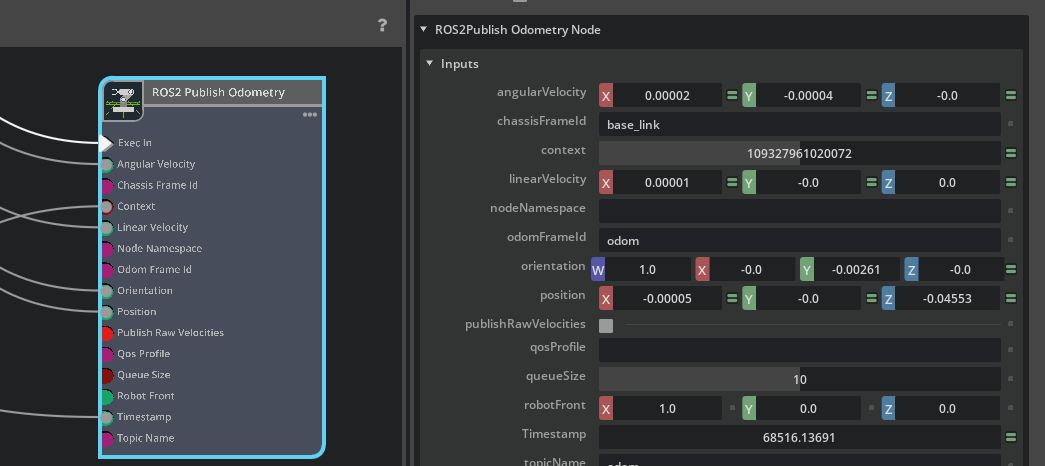
- 2-3. ros2 publish odometry노드의 property탭 ( 그림 5)
- chassisFrameId입력을 base_link로 설정.
- odomFrameId입력을 odom으로 설정
- ==> 이제 transform tree에서 odom --> base_link프레임 publish가 활성화 된다.
- 2-1. issac compute odometry노드의 property탭(그림 3)


- 3. 이제 odometry데이터와 odom -> base_link만 있는 transform tree를 publish하고 있다.
- 여기에 base_link 하위의 robot prim들을 transform tree에 추가하고 싶다.
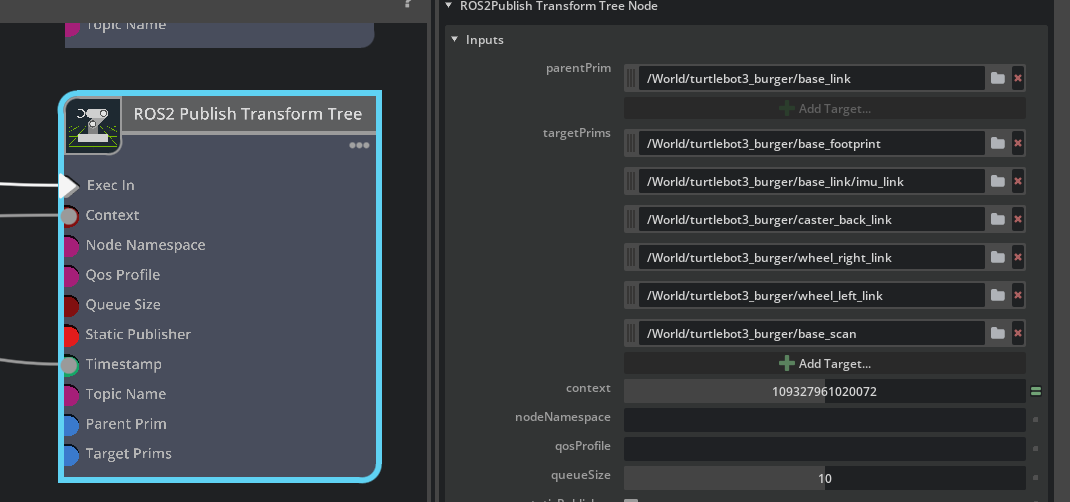
이를 위해서 그래프에 ROS2 publish Transform Tree노드를 하나 더 추가하고, 앞의 노드들과 동일하게 Exec In , context , timestamp를 연결한다.- Ros2 publish transform tree노드의 property 탭
- parentPrim입력을 turtlebot prim내부의 base_link경로 설정
- targetPrims에 그림6처럼 prim을 추가
- Ros2 publish transform tree노드의 property 탭
- 여기에 base_link 하위의 robot prim들을 transform tree에 추가하고 싶다.
- 4. odom --> base_link --> "다른 로봇의 링크들"로 그성된 transform tree를 publish한다.
- 이는 로봇의 ground truth localization이 필요할때만 요구된다. 보통 nav2 amcl같은 localization패키지가 global frame과 odom frame사이 transform을 담당한다.
- ground truth localization을 설정하려면, 그래프에 ros2 publish raw transform tree노드를 하나 더 추가한다.
그리고 exec in , context , timestamp를 동일하게 연결. - 새로 추가한 ros2 publish raw transform tree노드의 property탭 ( 그림 7 )
- childFrameId 입력을 odom으로 설정
- parentFrameId 입력을 world로 설정
- translation/Rotation 필드는 연결하지 않고 기본값을 사용한다.
- 만약에 로봇이 다른 위치에서 시작한다면, 해당 pose에 맞게 값을 업데이트 해야함.
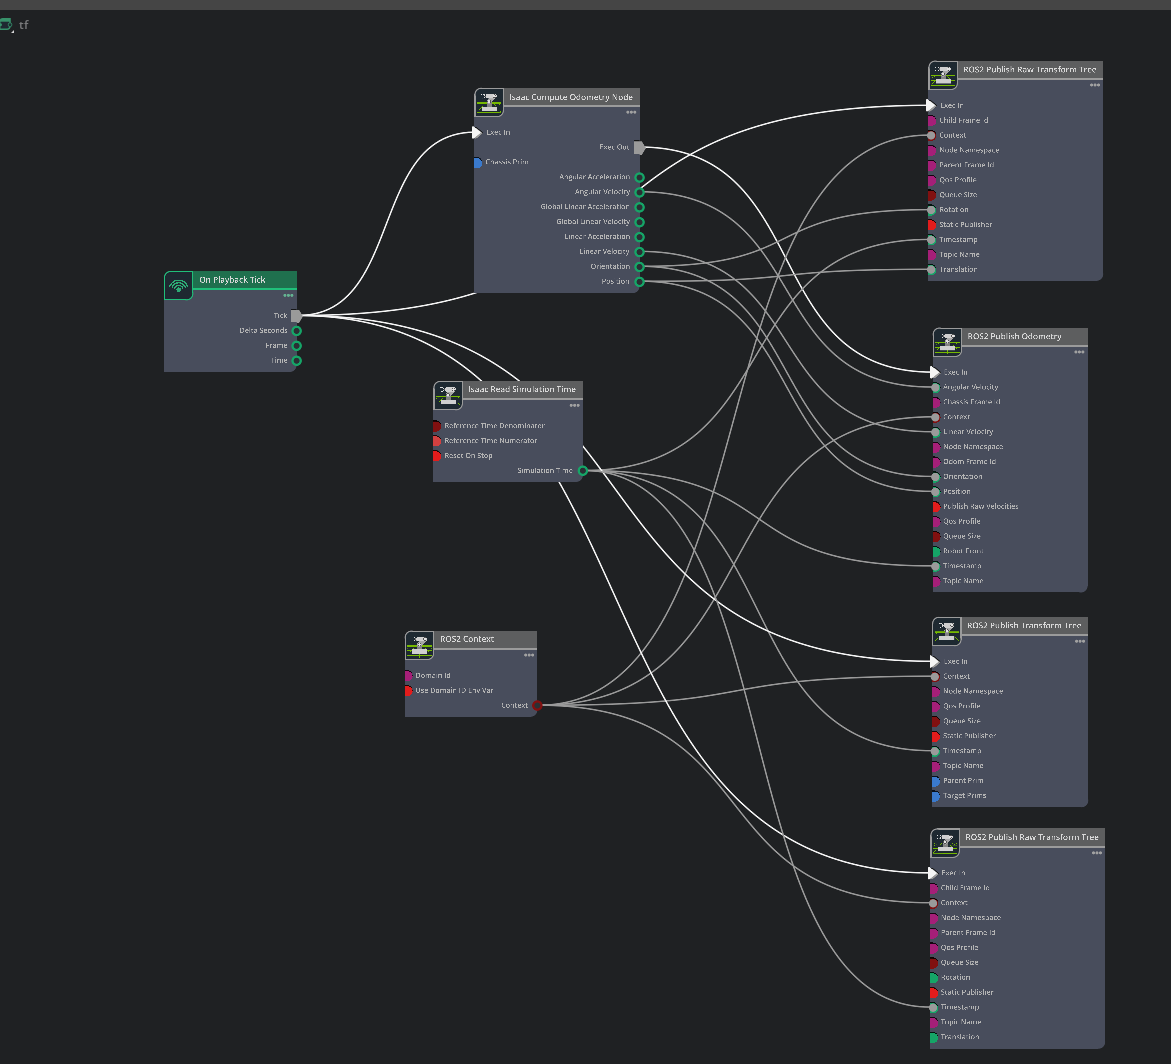
- 최종적으로 그림 8과 같이 나와야 함.

5. 아래 명령어 입력후 아래와 같이 나오는지 확인.
ros2 run tf2_tools view_frames
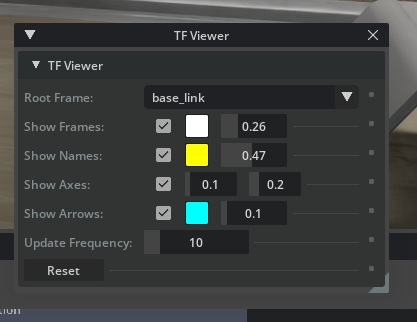
isaac sim에서 transform tree확인하기
1. 아래 사진의 TF viewer를 누르면 된다.

2.아래를 변경해가며 확인 가능

'코딩 및 기타' 카테고리의 다른 글
| [isaac sim] [node]Differential controller , Articulation Controller , issac read simulation time , isaac simulation gate (0) | 2026.02.28 |
|---|---|
| [isaac sim] [node] on playback tick , ros2 context , subscribe twist , scale to stage units (0) | 2026.02.26 |
| [isaac sim] ROS2 tutorials 4 (0) | 2026.02.23 |
| [tello] test 10 11 12 (0) | 2026.01.30 |
| [tello] test5 6 7 8 9 (0) | 2026.01.30 |